If you’re a grammar ace, don’t worry—I know that “octopuses” is considered more appropriate to pluralize “octopus,” but really–it doesn’t sound nearly as cute…
And speaking of cute–these are among my favorite toys to make. Who can resist their round little heads, their shiny black eyes, and their multitude of legs? They rest perfectly on a desk, bookshelf or windowsill–and with a little bell inside, they can be a welcome addition to any baby crib or toy box.
I can’t help but bust into a smile at the thought of being surrounded by hundreds of these little guys– of course, that may just take forever, since I’ve only made a handful of these guys so far, but one can dream—
On a side note: I hate weaving in ends—I know it’s an essential part of finishing a knit project, but that’s the point— When I’m “finishing” a project, I want to be “finished” as soon as possible! After a lot of trial and error, I finally devised the following pattern, which is done with one continuous piece of yarn (yay! only one strand to weave in!).
I hope you enjoy making these cuties as much as I do!
Knitted Octopus Pattern
NOTE: this pattern is for personal use only. Please do not use it for commercial purposes (i.e. selling).
Dimensions:
- Approximately 4.5″ diameter with size 5 needles and sport weight/ worsted weight yarn
Techniques:
- Knitting on double point needles
- Increasing stitches (kfb = knit in front and back of stitch)
- Decreasing stitches (k2tog = knit 2 together)
- Basic crocheting
Tools
- Set of double point needles
- Crochet hook
- Yarn
- Toy eyes (optional)
- Toy bell or squeaker (optional)
- Tapestry/knitting needle to weave in ends and embroider eyes (optional)
- kfb each stitch on a separate needle (6 sts, divided evenly on three double point needles). Place marker.
- kfb each stitch to marker (12 sts)
- [K1, kfb] to marker (18 sts)
- Knit 1 round
- [K2, kfb] to marker (24 sts)
- Knit 1 round
- [K3, kfb] to marker (30 sts)
- Knit 1 round
- [K4, kfb] to marker (36 sts)
- Knit 1 round
- [K5, kfb] to marker (42 sts)
- Knit 10 rounds
- [K2tog, k5] to marker (36 sts)
- Knit 1 round
- [K2tog, k4] to marker (30 sts)
- Knit 1 round
- [K2tog, k3] to marker (24 sts)
- Knit 2 rounds
- kfb, k1, kfb (5 sts)
- Work stockinette stitch for 3-3.5″
- k2tog, k1, k2tog
- Purl row
- Knit row
- Purl row
- k2tog, k1
- Purl row
- k2tog
- Bind off remaining one stitch
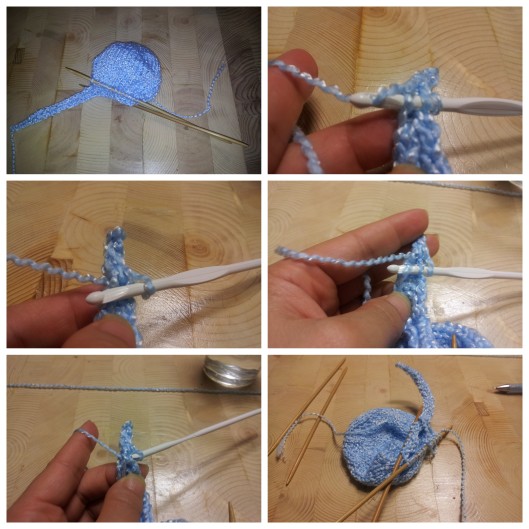
- Next, use a crochet hook to “sew up” the sides of the legs together. (Here is a useful link if you do not know how to crochet a seam: “Crochet a Seam with Your Crochet Hook”)
- Bind off when you are at the base of the leg
- Next, you will work the 3 stitches to the left of the leg you just finished (with the body facing you). Repeat the steps to make another leg. Do this until all 8 legs are completed.

BASE
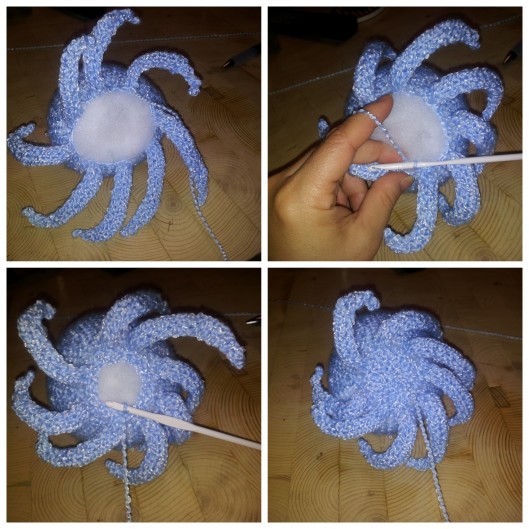
- Add toy eyes. I use safety eyes where the eye snaps into a disc and is nearly impossible to pull out. If this is a gift for a (gentle!) dog or cat, then embroidered eyes would be better. Wait until the doll is stuffed before sewing/embroidering eyes.
- Stuff the octopus with polyfil and a squeaker or bell if you want your octopus to make some noise.
- Crochet the opening closed. You are basically crocheting a circle from the outside in. Weave in end.

Sit back and revel in its cuteness!


Pingback: Oh My! Attack of the Octopi! – Knitted Octopus Pattern « knitting nandu « mz jenny lee
Oh these are so cute!! Your so talented!
A friend of mine makes knitted pigs, I got her to make me a Cow-Pig (it was a pig, with a black and white Friesian colouring!)
Pingback: Panda Plushy! Knitted Panda Toy « knitting nandu
Pingback: Meet Moby~~ Knitted Whale Toy « knitting nandu
Pingback: A Star is Born! Knitted Starfish Toy « knitting nandu
Pingback: Cid the Squid! Knitted Squid Toy Pattern | knitting nandu
This is genius! I love knitting toys, but hate all the sewing that often goes with it. Thanks for the great no sewing pattern.
Pingback: Pinch Me, Please! Knitted Crab Toy | knitting nandu
I am looking for an octopus hat pattern….to knit